
If you want to play with VMware VSAN and you don’t have three hosts (VSAN requirement) to play on or your lab doesn’t have enough resources to run nested infrastructure of three ESXi hosts you’ve got one more solution – run “cluster” of one ESXi host and force VSAN provisioning. In this post I will show you how to do it quickly and efficiently using virtual machine with ESXi 6.0 inside.
- Create virtual machine and set it’s resources.
You have to set virtual memory to at least 6 GB of RAM, this is neccessary for VSAN provisioning to complete!
- Add virtual disks – one for cache (SSD disk) and the other one for capacity (HDD disk). You can read how to add SSD disk to virtual machine in my post “Simulate SSD disk in VMware Workstation and vSphere“.
- Install ESXi on virtual machine – it’s just a standard setup process here, so I won’t describe it.
- We will provision VSAN from SSH – so, after booting ESXi and logging into DCUI, activate SSH using menu Troubleshooting Mode Options -> Enable SSH, and then login to ESXi host using SSH client.
- On SSH session you can list all available devices using command:
esxcli storage core device list
- Which displays all disks:
mpx.vmhba1:C0:T2:L0
   Display Name: Local VMware, Disk (mpx.vmhba1:C0:T2:L0)
   Has Settable Display Name: false
   Size: 512000
   Device Type: Direct-Access
   Multipath Plugin: NMP
   Devfs Path: /vmfs/devices/disks/mpx.vmhba1:C0:T2:L0
   Vendor: VMware,
   Model: VMware Virtual S
   Revision: 1.0
   SCSI Level: 2
   Is Pseudo: false
   Status: on
   Is RDM Capable: false
   Is Local: true
   Is Removable: false
   Is SSD: false
   Is VVOL PE: false
   Is Offline: false
   Is Perennially Reserved: false
   Queue Full Sample Size: 0
   Queue Full Threshold: 0
   Thin Provisioning Status: unknown
   Attached Filters:
   VAAI Status: unsupported
   Other UIDs: vml.0000000000766d686261313a323a30
   Is Shared Clusterwide: false
   Is Local SAS Device: false
   Is SAS: false
   Is USB: false
   Is Boot USB Device: false
   Is Boot Device: false
   Device Max Queue Depth: 32
   No of outstanding IOs with competing worlds: 32
   Drive Type: unknown
   RAID Level: unknown
   Number of Physical Drives: unknown
   Protection Enabled: false
   PI Activated: false
   PI Type: 0
   PI Protection Mask: NO PROTECTION
   Supported Guard Types: NO GUARD SUPPORT
   DIX Enabled: false
   DIX Guard Type: NO GUARD SUPPORT
   Emulated DIX/DIF Enabled: false

mpx.vmhba1:C0:T1:L0
   Display Name: Local VMware, Disk (mpx.vmhba1:C0:T1:L0)
   Has Settable Display Name: false
   Size: 122880
   Device Type: Direct-Access
   Multipath Plugin: NMP
   Devfs Path: /vmfs/devices/disks/mpx.vmhba1:C0:T1:L0
   Vendor: VMware,
   Model: VMware Virtual S
   Revision: 1.0
   SCSI Level: 2
   Is Pseudo: false
   Status: on
   Is RDM Capable: false
   Is Local: true
   Is Removable: false
   Is SSD: true
   Is VVOL PE: false
   Is Offline: false
   Is Perennially Reserved: false
   Queue Full Sample Size: 0
   Queue Full Threshold: 0
   Thin Provisioning Status: unknown
   Attached Filters:
   VAAI Status: unsupported
   Other UIDs: vml.0000000000766d686261313a313a30
   Is Shared Clusterwide: false
   Is Local SAS Device: false
   Is SAS: false
   Is USB: false
   Is Boot USB Device: false
   Is Boot Device: false
   Device Max Queue Depth: 32
   No of outstanding IOs with competing worlds: 32
   Drive Type: unknown
   RAID Level: unknown
   Number of Physical Drives: unknown
   Protection Enabled: false
   PI Activated: false
   PI Type: 0
   PI Protection Mask: NO PROTECTION
   Supported Guard Types: NO GUARD SUPPORT
   DIX Enabled: false
   DIX Guard Type: NO GUARD SUPPORT
   Emulated DIX/DIF Enabled: false

mpx.vmhba1:C0:T0:L0
   Display Name: Local VMware, Disk (mpx.vmhba1:C0:T0:L0)
   Has Settable Display Name: false
   Size: 40960
   Device Type: Direct-Access
   Multipath Plugin: NMP
   Devfs Path: /vmfs/devices/disks/mpx.vmhba1:C0:T0:L0
   Vendor: VMware,
   Model: VMware Virtual S
   Revision: 1.0
   SCSI Level: 2
   Is Pseudo: false
   Status: on
   Is RDM Capable: false
   Is Local: true
   Is Removable: false
   Is SSD: false
   Is VVOL PE: false
   Is Offline: false
   Is Perennially Reserved: false
   Queue Full Sample Size: 0
   Queue Full Threshold: 0
   Thin Provisioning Status: unknown
   Attached Filters:
   VAAI Status: unsupported
   Other UIDs: vml.0000000000766d686261313a303a30
   Is Shared Clusterwide: false
   Is Local SAS Device: false
   Is SAS: false
   Is USB: false
   Is Boot USB Device: false
   Is Boot Device: true
   Device Max Queue Depth: 32
   No of outstanding IOs with competing worlds: 32
   Drive Type: unknown
   RAID Level: unknown
   Number of Physical Drives: unknown
   Protection Enabled: false
   PI Activated: false
   PI Type: 0
   PI Protection Mask: NO PROTECTION
   Supported Guard Types: NO GUARD SUPPORT
   DIX Enabled: false
   DIX Guard Type: NO GUARD SUPPORT
   Emulated DIX/DIF Enabled: false
- By reading the output we can identify disks we want to use in VSAN:
/vmfs/devices/disks/mpx.vmhba1:C0:T1:L0 - ssd
/vmfs/devices/disks/mpx.vmhba1:C0:T2:L0 - hdd
- The next step is to check current VSAN policies:
[root@localhost:~] esxcli vsan policy getdefault
Policy Class  Policy Value
------------  --------------------------------------------------------
cluster       (("hostFailuresToTolerate" i1))
vdisk         (("hostFailuresToTolerate" i1))
vmnamespace   (("hostFailuresToTolerate" i1))
vmswap        (("hostFailuresToTolerate" i1) ("forceProvisioning" i1))
vmem          (("hostFailuresToTolerate" i1) ("forceProvisioning" i1))
- … and change these policies to reduce tolerated failures and force VSAN provisioning:
esxcli vsan policy setdefault -c cluster -p "(("hostFailuresToTolerate" i0) ("forceProvisioning" i1) ("stripeWidth" i1))"
esxcli vsan policy setdefault -c vdisk -p "(("hostFailuresToTolerate" i0) ("forceProvisioning" i1) ("stripeWidth" i1))"
esxcli vsan policy setdefault -c vmnamespace -p "(("hostFailuresToTolerate" i0) ("forceProvisioning" i1) ("stripeWidth" i1))"
esxcli vsan policy setdefault -c vmswap -p "(("hostFailuresToTolerate" i0) ("forceProvisioning" i1) ("stripeWidth" i1))"
esxcli vsan policy setdefault -c vmem -p "(("hostFailuresToTolerate" i0) ("forceProvisioning" i1) ("stripeWidth" i1))"
- Let’s check again to see if the policies have been changed successfully:
[root@localhost:~] esxcli vsan policy getdefault
Policy Class  Policy Value
------------  ---------------------------------------------------------------------------
cluster       (("stripeWidth" i1) ("hostFailuresToTolerate" i0) ("forceProvisioning" i1))
vdisk         (("stripeWidth" i1) ("hostFailuresToTolerate" i0) ("forceProvisioning" i1))
vmnamespace   (("stripeWidth" i1) ("hostFailuresToTolerate" i0) ("forceProvisioning" i1))
vmswap        (("stripeWidth" i1) ("hostFailuresToTolerate" i0) ("forceProvisioning" i1))
vmem          (("stripeWidth" i1) ("hostFailuresToTolerate" i0) ("forceProvisioning" i1))
- As policies are now correct, we can create new cluster:
esxcli vsan cluster new
- We can check our new cluster settings using command:
esxcli vsan cluster get
- Now it’s time to add disks to VSAN. The command below adds disks, where disk after -s parameter is SSD cache disk, and disk after -d parameter is HDD capacity disk:
esxcli vsan storage add -s mpx.vmhba1:C0:T1:L0 -d mpx.vmhba1:C0:T2:L0
- Let’s check list of VSAN disks:
[root@localhost:~] esxcli vsan storage list
mpx.vmhba1:C0:T2:L0
   Device: mpx.vmhba1:C0:T2:L0
   Display Name: mpx.vmhba1:C0:T2:L0
   Is SSD: false
   VSAN UUID: 529637e8-d6e6-ce69-e2e7-884841747241
   VSAN Disk Group UUID: 52fbe12f-6a00-3b1f-f4b2-100f93be9443
   VSAN Disk Group Name: mpx.vmhba1:C0:T1:L0
   Used by this host: true
   In CMMDS: true
   Checksum: 16871227982374977612
   Checksum OK: true
   Emulated DIX/DIF Enabled: false

mpx.vmhba1:C0:T1:L0
   Device: mpx.vmhba1:C0:T1:L0
   Display Name: mpx.vmhba1:C0:T1:L0
   Is SSD: true
   VSAN UUID: 52fbe12f-6a00-3b1f-f4b2-100f93be9443
   VSAN Disk Group UUID: 52fbe12f-6a00-3b1f-f4b2-100f93be9443
   VSAN Disk Group Name: mpx.vmhba1:C0:T1:L0
   Used by this host: true
   In CMMDS: true
   Checksum: 17302222945194844651
   Checksum OK: true
   Emulated DIX/DIF Enabled: false
- After adding disks the new datastore called vsanDatastore should show up. You can check it using vSphere C# Client or ESXi Embedded Host Client:
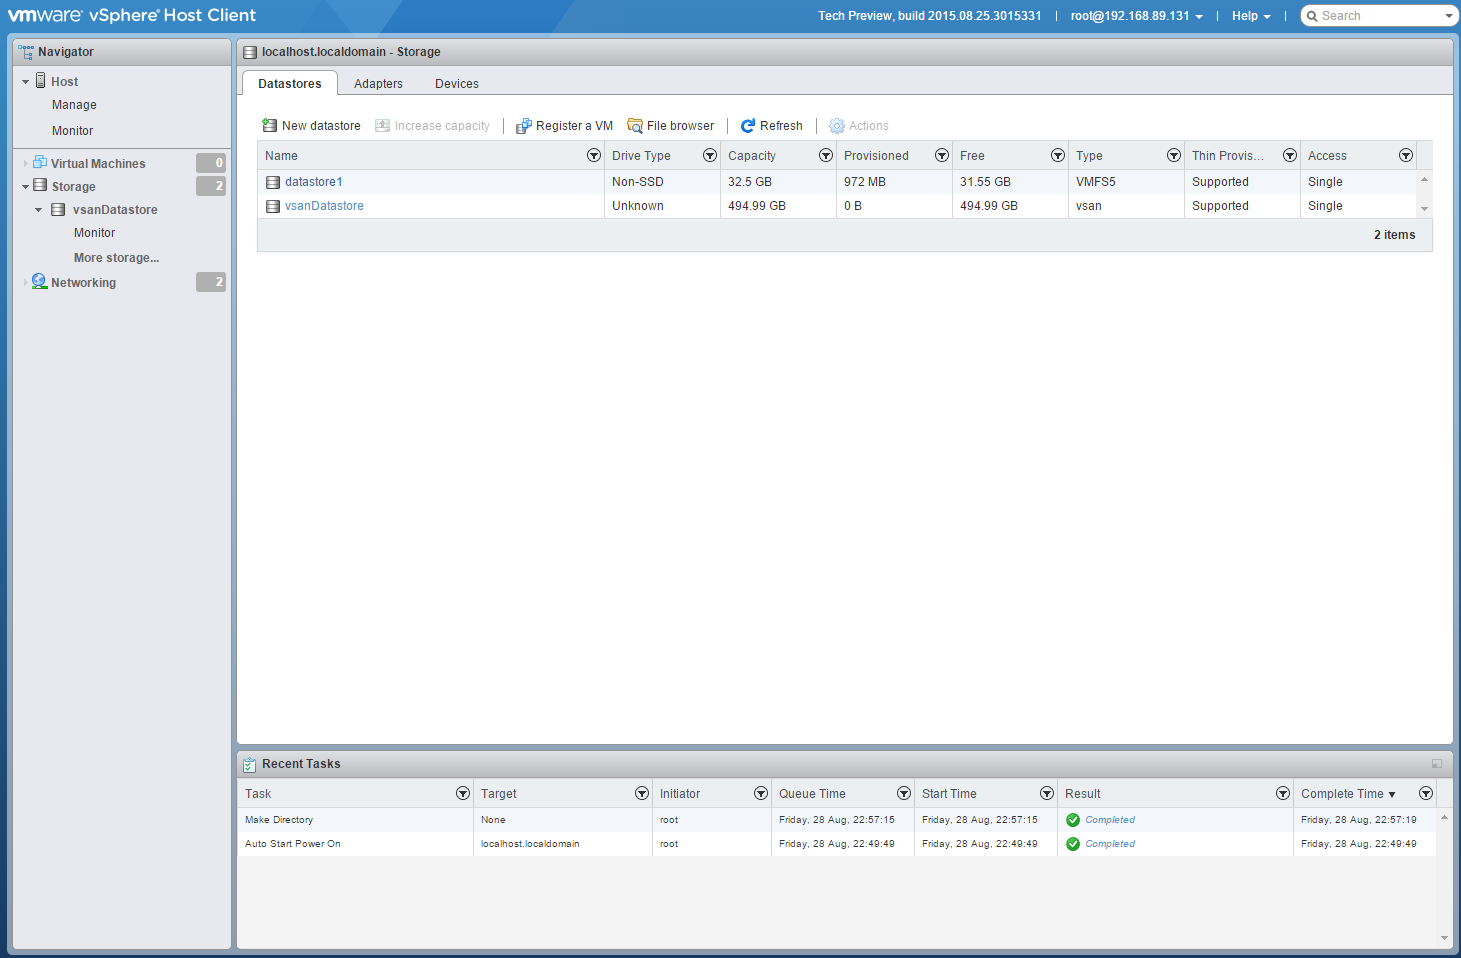
At this stage datastore based on VSAN is ready to work and we can deploy virtual machines on that datastore. One more thing we need to do is to connect ESXi to vCenter and assign VSAN license. Without that VSAN is going to work in trial mode for only 60 days.


Henrik Halt Aug 27 , 2022 at 03:52 /
Old, but still valid. Excellent, instructional, insightful. Thanks for this!